Prerequisites:
- Admin access to the FortiGate device.
- Familiarity with the Fortinet GUI (Web-based Manager).
- Ensure you know the provisioning server URL provided by TELAIR.
Instructions:
- Login to FortiGate Web-based Manager:
- Access the Fortinet firewall’s web interface by entering its IP address in a web browser.
- Login with your administrative credentials.
- Navigate to Network settings:
- On the left-hand menu, select Network > Interfaces.
- Select the Interface:
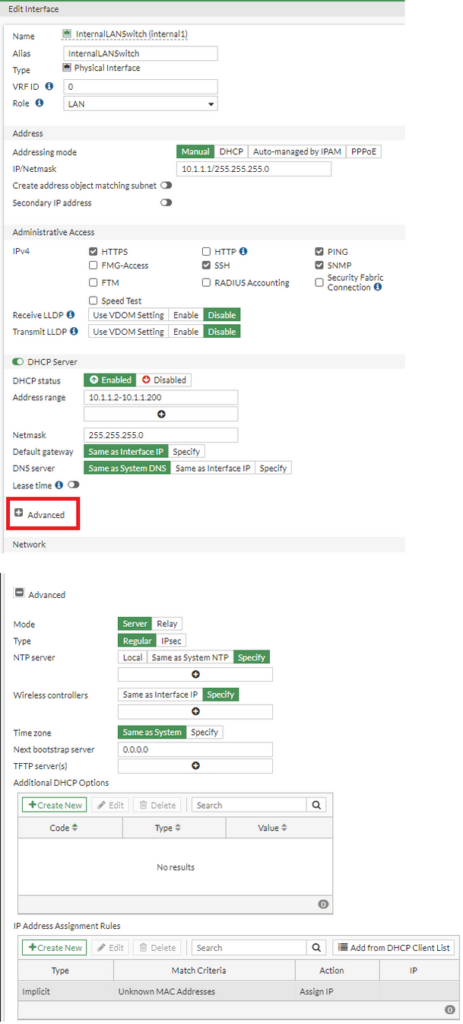
- Find and select the interface where your DHCP server resides (typically a LAN or internal interface).
- Click Edit.
- DHCP Server Configuration:
- Scroll down to the DHCP Server section.
- Ensure the Enable DHCP Server option is checked. If not, enable it.
- Configure Option 160:
- In the DHCP Server options, find the Advanced settings or DHCP Options.
- Click on Create New or Add.
- Set the following values:
- Type: Custom
- Name: Option160 (or a descriptive name of your choice)
- Code: 160
- Type: String
- Value: Enter the provisioning server’s URL provided by TELAIR.
- Click OK to save the configuration.
- Apply Changes:
- After adding the DHCP option, scroll to the bottom of the page and click OK or Save to apply the changes to the interface.
- Test the Configuration:
- Connect a device (e.g., a VoIP phone) that requires DHCP Option 160 to the network.
- Ensure the device receives the correct provisioning server URL or IP address and can connect to it.
Tips:
- It’s recommended to backup your FortiGate configuration before making any changes.
- You can also use the Fortinet CLI for this configuration if you’re more comfortable with that method.
- Ensure that the provisioning server is accessible from the devices that will be receiving the DHCP Option 160 setting.
Conclusion: You’ve successfully configured DHCP Option 160 on a FortiNet firewall for device provisioning. Devices connected to the specified interface should now receive the provisioning server details during their DHCP lease request.

